

How to Optimize Video Quality on Your Blink Outdoor Camera
In an era where over 80% of all internet traffic is driven by video content, ensuring your Blink Outdoor Camera delivers the highest video quality possible is crucial for effective home security. This step-by-step guide walks you through essential techniques to optimize your camera’s performance, from adjusting resolution settings to enhancing connectivity and lighting conditions. By following these tips, you can significantly improve the clarity and detail of your recorded footage, making it easier to monitor your property and identify potential threats. Don’t miss out on maximizing your camera’s capabilities—your peace of mind depends on it!
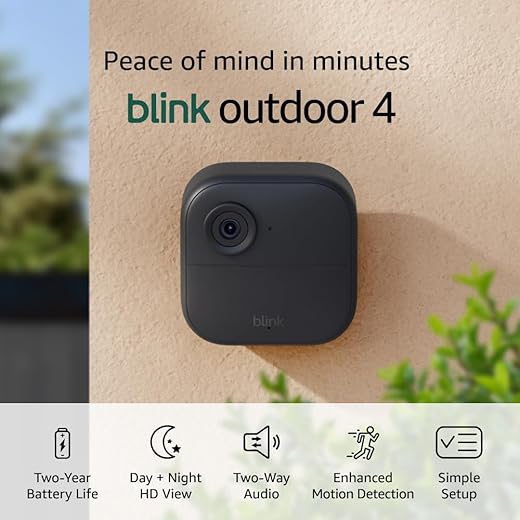


Essential Tips
Check Your Internet Connection
Check your Wi-Fi connection strength by looking at the signal bars on your device. Ensure that you have at least three bars of signal strength for optimal video quality. If you notice that the signal is weak, move closer to your router or access point. Sometimes, physical obstacles like walls or furniture can block the signal, so try to find a more open space in your home.
Consider using a Wi-Fi extender to improve your coverage if your signal is consistently weak. Plug the extender into a power outlet halfway between your router and the area where you experience poor connectivity. Follow the manufacturer’s instructions to connect the extender to your Wi-Fi network. After setup, check the signal strength again in your desired location. A stronger, more stable connection will significantly enhance your video streaming experience.
Adjust Camera Settings
Open the Blink app on your smartphone and log in to your account. Tap on the camera icon associated with the device you wish to adjust. Once the camera feed is displayed, look for the gear icon or settings menu, usually located in the upper right corner of the screen. Here, you’ll find various options related to your camera settings.
Scroll down to find the video resolution and frame rate options. Select the highest resolution available, such as 1080p, for clearer, sharper images. Next, adjust the frame rate; opting for 30 frames per second (fps) provides smoother video. If your connection allows, setting both options to the highest available will significantly enhance the quality of your recordings.
Position Your Camera Properly
Position your Blink Outdoor Camera in an ideal spot that offers a wide field of view while minimizing any potential obstructions. Choose a location that allows the camera to capture the most area possible, ensuring it can monitor all critical zones around your property. Install the camera at least 8 feet off the ground, which helps avoid interference from low-hanging branches or furniture.
Avoid placing the camera too close to walls, fences, or other objects that could block its line of sight. Check the surroundings and make sure there are no large items within the camera’s frame that might obstruct the view. Test the camera’s coverage by reviewing the live feed and adjusting its angle if necessary. This will help you achieve the best monitoring results and ensure nothing important goes unnoticed.
Update Firmware
Regularly check for firmware updates within the Blink app. This simple action can significantly enhance your camera’s performance and potentially improve video quality.
- Open the Blink app on your device.
- Navigate to the camera settings for the specific camera you want to update.
- Look for the firmware version displayed on the screen.
- If an update is available, tap on the update prompt to initiate the process.
- Follow the on-screen instructions to complete the update.
By keeping your camera’s firmware current, you ensure optimal functionality and access to the latest features and improvements. Don’t overlook this essential maintenance step!
Utilize Night Vision Settings
Enable the night vision feature in your device’s settings when operating in low-light conditions. Locate the settings menu and find the night vision option, then switch it on to enhance visibility in the dark. This adjustment allows your device to capture clearer images and provide you with a better view of your surroundings when visibility is limited.
Adjust the sensitivity settings for motion detection to ensure optimal performance at night. Access the motion detection settings in the same menu, and increase the sensitivity level if you notice that movements are not being detected properly. Test the adjustments by walking in front of the camera or device to confirm that it picks up motion effectively, making sure you tweak the settings until you achieve the desired responsiveness.
Test and Review Video Quality
Perform a test recording after making adjustments to your video settings. Ensure the environment is consistent with your intended recording scenario. Play around with the following aspects for optimal results:
- Lighting: Check if your subject is well-lit. If shadows are noticeable or colors appear washed out, consider repositioning your lights or using diffusers.
- Resolution: Record a short clip in various resolutions (e.g., 720p, 1080p, and 4K) and assess which setting gives the best clarity for your needs.
- Framing: Review the composition of your shot. Make sure your subject is centered and the background isn’t too distracting. Adjust camera angles as needed to improve the overall aesthetic.
After reviewing the footage, note any areas that need further refinement. If the colors seem off, tweak the white balance settings. If the audio is unclear, check microphone placement or consider using an external mic for better sound quality. Continue this iterative process, recording and reviewing, until the video quality meets your expectations.
Achieving the Best Footage
In conclusion, by implementing these simple steps, I can significantly enhance the video quality of my Blink Outdoor Camera. Regular adjustments and maintenance not only improve performance but also ensure that I have reliable security coverage. With a little effort, I can enjoy clearer images and greater peace of mind knowing my home is well-monitored. Happy filming!
Essential Equipment Needed
Enhance Your Footage
Step-by-Step Guide to Setting Up and Maximizing Your Blink Outdoor Security Camera
- Set Up the Camera: Start by downloading the Blink app on your smartphone. Follow the in-app instructions to create an account, then add your Blink Outdoor Camera by scanning the QR code on the camera
- Position the Camera: Choose a location that covers the area you want to monitor. Make sure it’s within range of your Wi-Fi network and that it’s mounted securely for optimal performance
- Customize Settings: Within the app, you can adjust settings like motion detection sensitivity, notification preferences, and camera schedules. Take some time to explore these options to tailor the camera to your needs
- Test the Live View: Use the app to access the live view feature, ensuring the camera is capturing what you want it to. This is a great way to check the camera’s angle and clarity
- Review Footage: Familiarize yourself with how to access recorded videos. You can view past footage through the app, which is useful for checking events or incidents
- I hope these tips help you get started with your Blink Outdoor Security Camera! If you have any more questions, feel free to ask!
Common Questions About Your Blink Outdoor Camera
The Blink Outdoor Security Camera has several key features that make it a popular choice for home security. Firstly, it is designed for both indoor and outdoor use, making it versatile for various monitoring needs. It offers HD video quality, which ensures clear visuals day or night, thanks to its infrared night vision capability.
Another significant feature is its two-way audio, allowing me to communicate through the camera, whether I’m at home or away. The camera is also wireless and battery-powered, which means I can easily install it in any location without worrying about power outlets.
Additionally, it has motion detection alerts that notify me via the Blink app when any movement is detected, helping me stay informed about activity around my home. The Blink Outdoor also supports cloud storage options, giving me the choice to save and access footage securely.
Overall, these features combine to provide a reliable and user-friendly security solution.
The two-way audio feature on the Blink Outdoor Camera allows me to communicate with anyone near the camera through the Blink app on my smartphone. When I tap the microphone icon in the app, it activates my device’s microphone so I can speak, and the sound is transmitted to the camera’s speaker. Conversely, I can also hear audio from the camera’s location, which helps me monitor what’s happening in real-time. This feature is great for checking in on pets or speaking to visitors without having to open the door. Overall, it provides a convenient way to interact with my surroundings remotely!
Also Read: Best Affordable Alarm Systems for Renters


About the Author: Oliver James


news via inbox
Stay updated with the latest tips and offers. Subscribe to our newsletter today!


I really found the tip about checking your internet connection super helpful! I didn’t realize how much my Wi-Fi speed could affect the video quality. I switched to a dual-band router, and now the footage is crystal clear. Anyone else had similar issues? Would love to hear your experiences!
I’d love to see an article on integrating Blink Cameras with smart home systems like Alexa or Google Home. It’d be cool to learn how to control everything together!
That’s a fantastic idea! Integrating smart home devices can really enhance functionality. We’ll definitely consider this topic for a future article. Stay tuned!
Wow, I never thought positioning my Blink Outdoor Camera could make such a difference! After moving it to a higher spot, the video quality improved drastically. It’s now catching way more detail, especially when people walk by. Highly recommend this step!
Does anyone have advanced tips for fine-tuning video quality? I’m trying to optimize my camera for a larger area but still want clear footage. Any advice would be awesome!
Great question! For larger areas, consider increasing the camera’s motion sensitivity and adjusting the resolution settings to get the best results. Also, try to avoid direct sunlight on the lens!
Thanks for sharing your experience! Wi-Fi can definitely make a big difference. We recommend placing your router closer to the camera if possible, or even considering a Wi-Fi extender for better coverage.
I recently used the information in this guide to set up my Blink Outdoor Camera for my front porch, and it’s been an absolute game-changer. I can now keep an eye on packages and visitors effortlessly! Highly recommend following these steps.
Can anyone recommend specific brands of Wi-Fi extenders or better routers that work well with Blink cameras? I want to ensure I get the best connection possible.
There are a few solid options like the TP-Link Deco series or the Netgear Nighthawk range that are known to work well with Blink cameras. Just make sure they support the right bandwidth for your needs!
I adapted the step about adjusting camera settings because I primarily record during the day. I set mine to 1080p instead of 720p to get the best daytime footage. It’s made a huge difference in clarity. Just thought I’d share in case others are in the same boat!
That’s a smart adjustment! Daytime settings can really enhance video quality. It’s great to hear you found a solution that works for you. Keep experimenting with those settings!